Total Pageviews

Wednesday, June 22, 2011

Common Troubleshooting of Banglalion Wimax Modem

Banglalion Wimax is most most commonly used wimax netwok in Bangladesh, as it covers all major cities of Bangladesh . Other wimax operators quebee is currently available in dhaka city.  There are many newbie users getting interested into internet and using Banglalion Wimax as their internet provider . Lets a take a look some common troubleshooting of Banglalion wimax Modem.


The system can not run the installation program automatically.
This problem indicates that your system configuration is not suitable for autorun banglalion wimax modem installation.
This problem could be solved easily .. Just go to My Computer->Open Disc of Banglalion Modem -> Run autorun.exe
Another reason of this problem could be some other version of Banglalion Wimax modem is installed in your system . So please uninstall other version before install the new version. You can uninstall through Control Panel.

Another Common problem is Modem insertion does not run UI Program automaticly.
Here also the possible reason is system configuration and in this case you have to run UI program manually.

You could also face a  termination of Banglalion Wimax Modem installation at the end of installation Process. 

Possible reason is your system security configuration. 
If you face termination of installation process Go to Control Panel-> System and Security -> System -> System Protection -> Configure... -> Turn off system protection 


Tuesday, June 14, 2011

EDVO VS EDGE COMPARISION

EVDO and EDGE both are high speed wireless networks . As cell phones become more like PDAs, people are accessing larger files such as email attachments with these devices and even watching youtube video ,using facebook like social networking site. Many people in Bangladesh also in whole world using cell phone as their modem .

These wireless broadband networks have speeds that are many times faster than typical cell phone connections, but the throughput rates can differ dramatically. One difference is the protocol your cell carrier uses. In the Bangladesh, the predominant standards are CDMA and GSM. Each of these standards has their own high-speed protocol. In some regards, this is like DSL and cable access. Both offer high-speed access at different rates and each requires their own equipment.


EVDO (FOR CDMA)

In the CDMA world, the high-speed wireless protocol is called EvDO. Like many abbreviations, this one has two translations: Evolution Data Optimized and Evolution Data Only. In Bangladesh , Only Citycell using CDMA technology for mobile network.
EVDO is more likely faster among two networks.Currently Citycell offering highest speed at 512Kps which means if you dont have any system loss , you can get download speed at around 64 KB/s
 .Citycell networks covers almost all major cites in Bangladesh .

EDGE (FOR GSM)
 
The  GSM world has its own protocol and acronym EDGE. EDGE stands for Enhanced Data Rates for Global Evolution. Although it is much slower than EvDO, it does offer some advantages. In Bangladesh , remaining four mobile network Grameen, Banglalink , Airtel [Previously Warid],Robi[Previously Aktel] use GSM technology for their mobile netwok . I have not seen any documents where these carries disclose their speeds . But EDGE is usually cited cite 70-135kbps with bursts to 200kbps.

Sunday, June 12, 2011

Icloud : A cloud service from Apple

On June 6th  Steve Job’s Apple announced at Apple Worldwide Developers Conference that iCloud service will be available to the public along with release of iOS 5 .

iCloud stores your music, photos, apps, calendars, documents, and more. And wirelessly pushes them to all your devices — automatically. It’s the easiest way to manage your content. Because now you don’t have to.


iCloud is so much more than a hard drive in the sky. It’s the effortless way to access just about everything on all your devices. iCloud stores your content so it’s always accessible from your iPad, iPhone, iPod touch, Mac, or PC.

Tuesday, June 7, 2011

How to do Factory Restore of a name brand Laptop

Restoring factory settings just restores the default settings and options that a computer had when you first got it  or first buy it (they were specified as it was built in a factory, thus the name). In doing this the computer is often wiped clean and essentially erased to bring it back to its initial state.
Bringing initial state might cause you to erase you documents and saved files , specially stored in your primary directory or partition.

Below is the instructions of Laptop Recovery of several name brand .

Dell Factory Recovery Instructions :

1. Reboot, and press Ctrl + F11 at the Dell logo.
2. The Dell™ PC Restore by Symantec screen will come up.
3. Select "Restore" or use the Tab key to highlight it and press Enter.
4. if you wish to continue, click "Confirm", or use the Tab key to highlight it and press Enter.
5. When the utility is finished, click "Finish", or use the Tab key to highlight it and press Enter. 

Dell Official Site Instructions For Factory Restore

HP/Compaq Recovery Instructions :
1. Reboot, and repeatedly press F10 at the HP logo until the recovery screen appears.
2. When the recovery screen appears, press "Next" and then "Yes" to perform a non-destructive recovery.
3. To perform a destructive recovery, click "Advanced" and then "Yes".
4. After the recovery is finished, the laptop will reboot.

Hp Officail site Instructions for Factory Restore

Gateway Recovery Instructions :
1. Reboot, and press F11 or the R key to start the recovery process.
2. Select either "Full System Restore (Destructive)" or "Full System Restore (With Backup)"*.
3. Click "Next", and then click "Yes" to confirm the recovery process.
4.Wait for the computer to restore itself. When it is done, click "Reboot" to reboot the computer.

*Full System Restore With Backup preserves data in the My Documents folder, but requires 4 GB of disk space.


Gateway Official Site Instructions For Factory Restore


Acer Recovery Instructions

 1. Power on the machine
2. At the white ACER BIOS screen, hold the “Alt” key and press the “F10” key simultaneously to start Acer eRecovery
3. Once eRecovery has loaded, click “Restore to Factory Default Settings”
4. Click “OK” to continue
5. From here, the eRecovery process will update all the data on the C: drive and restore a fully functional factory image (approximately 10 minutes).
6. Once eRecovery has run, press “OK” to reboot unit


Sunday, June 5, 2011

Disk Management Utility Partitioning Hard Disk Without Formatting For Windows 7 and Windows Vista

Disk Management Utility Program in Windows 7 and Windows Vista can change your hard drive volume without formatting your drive. You can delete,re-size or even create a new partition with Disk Management Utility of Windows7 and Vista.
Following is the easy tutorial to describing how to achieve  new partition without formatting your hard drive.
First Go To Start Menu and then Right Click on Computer and click on "Manage" .

It will Open up "Computer Management" Window . From Computer Management Window Expand "Storage" and then click on "Disk Management"
After you will get  a view of all the drives present in your computer.

Now right Click on the specific  partition , you like to like  expand or Shrink . To make a new partition , you have to shrink an existing partition to get space for new partition. Now navigate to option "Shrink Volume"

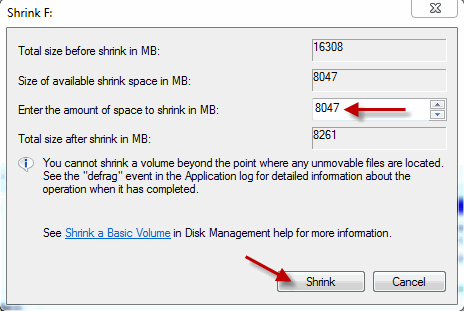
    A new window should open in which the size of the drive before shrink will be mentioned and the available space to shrink will be mentioned , and in the next line you will be asked to enter the amount of space you want to shrink and this will be the size of the new partition.

Caution : The space you enter must be within the limit of the available space displayed above.


After entering the values click on the option “ Shrink ” and wait for the process to complete. The time taken for the operation may be long depending upon the size of the disk and the space to be shrunk. Once the operation is completed a window appears showing unallocated space and the value is exactly the one you entered earlier. Select this unallocated space and on right clicking on it click on the option " New Simple Volume ".
A wizard will open up. Go through the wizard and fill in the values required. Usually the value needed to enter is the same one that you entered as the volume to be shrunk.

The drive newly created needs a letter to be assigned to it. Assign any letter of your choice as it does not make any difference.

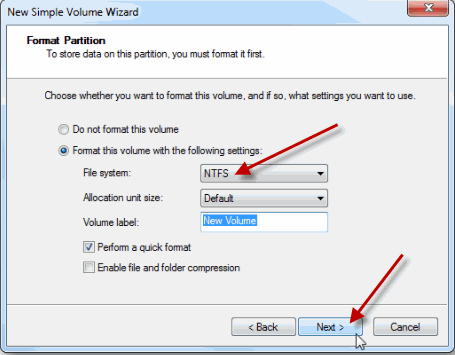
A Format page will appear and in it carefully notice that the File System selected is “ NTFS ” . After this is done enter a name for your drive and then click on ” Next ” and then “ Finish
You have reached your goal. You have partitioned your Hard Drive in Windows 7 without formatting your computer and without the use of any software. Feel free to drop your comments in the comment box.

For Windows 7 Home or starter edition , You can partition upto 4 where for Windows 7 Ultimate version you can go above that.

Saturday, June 4, 2011

How to Start and Stop workstation service

Workstation Services Provides network coonections and communications using the Microsoft Network services.Workstation service enables access to network shares. Without Workstation
You cant use any SMB [SMB, which stands for Server Message Block, is a protocol for sharing files, printers, serial ports, and communications abstractions such as named pipes and mail slots between computers. ] share from your machine.
.
You Can Start workstation from Services.msc [services management console] . To do that ,

First Go To Run and write Services.msc and Press Ok

It will open up services management console . Here You will see a lot of service . From there look for Workstation and Click here to Open up workstation


Then You will prompted to Workstation windows .. You will see start Stop Button There to start or stop workstation service of You machine


Starting Workstation from Command line is lot more easiler than doing from service management console. Open up command prompt and type

net start workstation          
net stop workstation.

if you get access denied message , you have to go to the appropiate directory and then use the above command.

Wednesday, June 1, 2011

Power Management System For Windows 7 and Windows Vista

Windows 7 and Windows Vista come with built in Power management system , suitable for Laptop ,but if you are on Desktop computer , you might not want your computer go to sleep mode automatically.
Here is the tutorial to disable your Power management system of your Windows 7 and Vista Operating System.

 Disable Power Management For Windows 7

Start by clicking on the power icon, and open up the More power options:
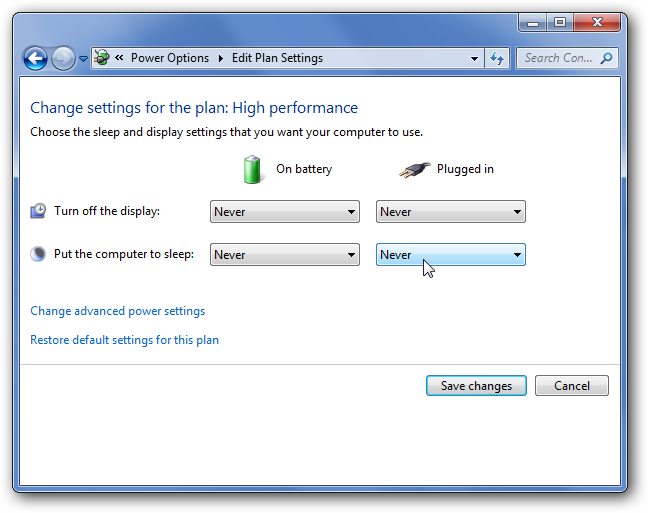
 Under the “Additional plans” section, select High Performance, then “Change plan settings”:
Then change everything to “Never”, and save the changes:
 Disable Power Management For Windows Vista
To configure Power Management on Windows Vista click on Start, Run and then Control Panel.

Control Panel has two views. If you are in Theme View double click on "System and Maintenance"


Click the Power Option

After get into the Power Option , You can either choose pre-configured  plan or you can create new plan

The initial screen for editing a plan allows you to change the monitor and sleep timeout settings.
 To change more settings click on "Change advanced power settings". Here you will be able to enable or set values for a variety of Power Management options.